There is something reassuring about rolling block dice to knock players down, break their armors and knock them off the pitch! However, this guilty pleasure can be elusive as sending many players into contact with the aim of rolling countless block dice usually has the opposite effect, i.e., the more blocks you want, the fewer you will get. Luckily, I am here to help you! This article covers the basics of what you need to know about blocks and how to get more of them.
Blocks are every coach’s bread and butter. Just about everyone structures their turns around this mechanism. That is why mastering blocks is important for all races, whether they are muscular or agile. If you coach elves and go to war like dwarves, you will lose. If you coach dwarves and brawl stupidly, you will also lose. This is because movement and agility rules at blood bowl, and when you say blocks, you also say immobility. It is therefore to your advantage to seek the right balance of your race between using its strength and its mobility.
The Statistics
To address the statistics related to block dice, we must first take these dice for what they are; ordinary six-sided dice with symbols instead of numbers. The coveted POW is obviously the equivalent of a 6… going all the way down to the shamed Skull which is more like a 1. This rationalization then allows us to find a statistical equivalent on a D6 for each block action.
The table below converts block actions into difficulty thresholds on a D6. These statistics demonstrate quite clearly that rolling block dice is reassuring because these actions – even the most ill-considered ones – are statistically reasonable, or at least probable.
One clarification, however, is that the table does not take into account the chances of success, but rather the chances of turnover. This is because where, for example, a dodge often has a binary outcome (success or failure), a block has a gray area depending on the coach’s intentions (sometimes a simple push is acceptable while other times only a POW is sought out).
Statistical Equivalents
| Block actions | Equivalent thresholds on a D6 |
|---|---|
| 3 dice against | 5+ |
| 2 dice against | 4+ |
| 3 dice against with Block | ~ 4+ |
| 1 die | 3+ |
| 2 dice against with Block | ~ 3+ |
| 1 die with Block | 2+ |
| 2 dice | 3+ with reroll |
| 3 dice | ~ 2+ with reroll |
| 2 dice with Block | 2+ with reroll |
| 3 dice with Block | ~ 1+ |
THREE-DICE BLOCKS
At blood bowl, three block dice are the maximum number of dice you can roll at once. Obviously, every one of your players should try to roll three dice whenever possible, especially those who do not have the Block skill. Not only are the odds of knocking down the target better, but the odds of not failing are also better (1 in 27 rather than 1 in 9, which is three times fewer chances of turnover… which is no small difference). Rolling three block dice is even better if your player has the Block skill, as their chances of turnover drop below 1%.
To roll three block dice, strength 5 Big Guys need two assists when blocking a strength 3 target. The same is true for a strength 3 player blocking a strength 2 target. Be careful, though, because all these players invested against a single target tend to weaken your team’s positioning and provide tactical opportunities for your opponent!
Two-dice blocks
Rolling three-dice blocks is often a fantasy. The risks involved in obtaining these highly advantageous blocks are rarely worth it. Fortunately, two-dice blocks are statistically sound enough to be the bread and butter of any blood bowl coach. As we will see later in this article, to minimize the mood swings of luck, these blocks should primarily be attempted by players with the Block or Wrestle skills. It does not matter if an incompetent player is a formidable mountain of muscles compared to its target. With a 1 in 9 chance of failure, that player is at much greater risk of turnover than his skinnier teammate with the Block skill.
Rolling two block dice is the equivalent of rolling a die with a reroll; you look at the first die and, if you are not happy with it, you look at the second. If you are still not happy and reroll that same block, you have just burned through the equivalent of three rerolls on a single dice roll. It is no wonder that two-dice blocks are one of the safest actions at blood bowl!
ONE-DIE BLOCKS
There are times when rolling a one-die block makes sense or is inevitable. For example, to clear a tackle zone from a player to allow a two-dice block somewhere else, or to tempt your fate at a golden opportunity or pivotal moment. In these circumstances, it is nice to know that the odds of failure are not as bad as you might think – especially if you have a reroll at hand… and the Block skill.
Still, before you roll that fateful die, make sure the ball is safe. Also, it may be a good idea to take some time to ask yourself if those blocks are worth it. Sometimes it is better not to attempt anything at all than to burn through reroll after reroll and risk making life easier for your opponent. Be sure to gauge your safety and surprise ratio before rolling your die!
TWO or three-DICE AGAINST BLOCKS
You will not be surprised if I tell you that it is best to avoid rolling them. However, there is a not-so-well-kept secret at blood bowl: the two-dice against with Block. In fact, this unfavorable block action is regularly attempted. Heresy? Not at all! It is roughly equivalent to a 3+ dodge. And it makes even more sense if you are willing to burn a reroll on this block (you then only have a 1 in 10 chance of turnover). Occasional, measured risk-taking of this type on, say, a surf attempt or to free a player from a Big Guy, is not as far-fetched as many coaches might think.
The BLOCK, WRESTLE AND BRAWLER SKILLS
There are good reasons why we regularly hear that the Block skill is king at blood bowl! A quick study of the previous stats table informs us that a two-dice block with the Block skill is more reliable than an incompetent three-dice block. Better yet, even a two-dice against block with the Block skill is more reliable than an incompetent one-dice block! The Block skill reduces your chances of turnover and, therefore, helps stabilize your team’s performance.
Remember that good coaches regulate the rhythm of their victories by creating and solving game situations with reasonable probabilities.
It must be admitted that players with the king skill are the heart of any team and the cornerstone on which the majority of your game turns will be based. Players without Block are not reliable enough, no matter how strong they are. You simply cannot trust them, especially if they have the Loner trait.
With exceptions, when rolling Block dice, your goal should first be to avoid the skull and then to knock down the target. Sure, getting the POW is cool and all, but seriously, ending up on your arse is not a harmless failure; it is a risk of being injured and a turnover that forces you to forfeit all other actions you might have attempted on that same turn. You might as well have handed your opponent victory on a silver plate!
Here is a table of statistics detailing block actions with and without the Block skill. It is presented in descending order of turnover probabilities.
TURNOVER Probabilities
| Block action | Turnover odds* | … with a reroll* |
|---|---|---|
| 3 dice against | 7/10 | 1/2 |
| 2 dice against | 5/9 | 1/3 |
| 3 dice against with Block | 2/5 | 1/6 |
| 1 die | 1/3 | 1/9 |
| 2 dice against with Block | 3/10 | 1/10 |
| 1 die with Block | 1/6 | 1/33 |
| 2 dice | 1/9 | 1/80 |
| 3 dice | 1/27 | 1/1000 |
| 2 dice with Block | 1/36 | 1/1300 |
| 3 dice with Block | 1/200 | 1/50000 |
Looking at the table we notice that having at our disposal more muscular players than the opponent is useful mano a mano because an incompetent two-dice block is more reliable than a 1-die block with the Block skill. However, the advantage of the Block skill is felt as soon as you roll two-dice blocks because they are more reliable than even incompetent three-dice blocks!!!
These stats explain why, for example, a muscular team of incompetent Black Orcs would be better off scattering their positioning against a Dwarf team armed to the teeth with the Block skill. Send your Strength 4 Big Uns in a tight pack against dwarves and you risk defeat. Force the Longbeards to mark your Big Uns mano a mano and suddenly your chances will seem statistically better!
ODDS of Knocking Down a Player
Statistics tables detailing the odds of knocking down players periodically appear on the Web… but they are all unreadable because they are so full of variables! Anyway, you do not need to remember all these statistics. The following lessons should be more than enough for you to see, uh… the table.
- An incompetent player blocking an incompetent target is just as if they each had the Block skill. With two dice, you have a ~50% chance of knocking down the target. With three dice, it is ~70%.
- Rolling a two-dice block, if your player has the Block skill but not the target, your chances just jumped to 75%. Many coaches approach these blocks with the certainty that the target will be knocked down. You should not do the same. After all, would you trust a 4+ roll with a reroll? No? The odds are the same! However, success becomes much more likely with three Block dice (90%)
- 2 dice with Block (75%) are more effective at knocking down a target than 3 incompetent dice (70%)
- By extension, a strength 3 player with Block is more effective at knocking down an opponent than his stronger but incompetent teammate
- 1 die with Block (33%) is slightly more effective against the Dodge skill than 2 incompetent dice (30%)
- The Block skill does not increase the probability of losing the ball to its carrier … even when the target has the Dodge skill (it is rather Tackle that does this job). On the other hand, Block eliminates a chance of turnover
You can take a look a the full blocking stats tables here.
THE WRESTLE SKILL
Statistically, the Wrestle skill works just like the Block skill in that it removes a chance of turnover on the block dice. While it is generally considered an inferior skill to Block, it does have some very useful features:
- Unlike Block, which helps to keep you on your feet, Wrestle seeks to put your player down at the same time as the opponent. This can open up new tactical opportunities
- Ultimately, Wrestle rolls less armor than Block on both sides of the pitch
- With a 75% chance of success on a 2-dice block and a 90% chance of success on a 3-dice block, Wrestle is more effective than the Block skill at putting a player with the Block skill down (which it negates), or with the Block + Dodge skill combo (~50% chance of success on 2 dice and 66% chance of success on 3)
- By extension, unlike the Block skill, Wrestle increases the chances of losing the ball to its carrier
THE BRAWLER SKILL
Some coaches seem to love the Brawler skill, but that is probably because the skill is available by default on some players. In reality, very few coaches would select it over Block if they had the choice. In fact, the Brawler skill only really becomes interesting when the player acquires Block, since there is then very little downside to using it.
Here is a table comparing the turnover probabilities of Brawler versus Block. It is up to you to judge if this skill is a “poor man’s Block”.
TURNOVER ODDS
| 1 die block | 2 dice block | 3 dice block | |
| Block | 1/6 | 1/33 | 1/200 |
| Wrestle | 1/5 | 1/18 | 1/60 |
| Incompetent | 1/3 | 1/9 | 1/25 |
The Brawler skill has been discussed in detail in the Black Orcs Playbook here.
HOW TO MAXIMIZE YOUR BLOCKS
To win games, it helps to dish out more blocks than you receive, and the best way to achieve that goal is to have as many players as possible in contact with the opponent at the beginning of your turn. Read that sentence again because it is worth understanding. We are not talking about having as many players as possible in contact at the end of your turn … but at the beginning of your turn! If your players are in contact with their opponents at the end of your turn, your counterpart will roll the block dice and you will be the one to suffer.
You should work to leave only the bare minimum of players in contact at the end of each of your turns.
That said, some skillfully developed and coached teams can send many of their players into contact at the end of their turn, especially if their players have the Block, Guard and Stand Firm skills. However, few races have this luxury and most coaches will prefer to keep contacts to a minimum to avoid ending up on the wrong end of the stick.
In short, unless you have an imposing advantage in strength, numbers, or skills, leaving your players in contact with your opponent’s players at the end of your turns is an excellent way to roll few or even no block dice … and lose the game.*
* Obviously, coaches in complete control of their game will find plenty of opportunities to successfully break this rule of thumb. But until you are enlightened by Nuffle’s grace and join the ranks of coaches who know exactly what they are doing, you should better stick to this ancient wisdom or risk being disgusted with the game!
My “Secret Weapon”
Now, you are probably wondering how to get the opposing players to scotch themselves to your own so that you can block them around without getting blocked back … and you are probably expecting me to reveal my secret weapon for doing so. So here it is. It is all in one sentence.
To roll a ton of favorable blocks, you need to create pressure until your opponent compromises his players by necessity
I heard your sigh of exasperation from here! Rest assured, this abstract secret weapon is covered extensively in the Offenses and Manoeuvres article. Basically, the team with the initiative and applying the most pressure is usually in a better position to roll many blocks. Meanwhile, the other team is too busy patching up their sinking ship to efficiently retaliate.
In other words, if you apply more pressure (with or against the ball) than your opponent can handle, you will naturally roll a ton of block dice. Conversely, if you are under untenable pressure and your players are forced into contact, you will naturally offer a lot of blocks with little opportunity to retaliate.
With this abstract secret weapon now laid out in black and white, there are a few tips that can help you apply pressure and roll more block dice… Here are a some of them.
The Tips
Tip #1
Leverage Pushes
We often see rookie coaches invariably order their players to follow an opponent who has just been pushed. However, it is better to approach each push on a case-by-case basis and analyze if it is useful to follow or if it is better to keep a distance. Indeed, following a pushed player is not a harmless gesture because your own player risks getting blocked in return. This block can lead to a KO or injury, and each of your players ejected from the pitch reduces your ability to maintain pressure and therefore roll some block dice.
As a rule of thumb, it is wise to follow a knocked down target because you can block it again if it stands up. On the other hand, it is often wiser not to follow a pushed target, except when your player will provide support to another two-dice block on that target.
Be careful not to break a screen of tackle zones by ordering your player to follow a target he has just knocked down. This blunder could threaten the safety of your drive.
That said, for creative coaches, there are plenty of ways to use pushes to increase a team’s efficiency and apply more pressure on their opponents. Here are a few of them.
Push the Target on Your Own Players
This tip obviously does not reinvent the wheel. Pushing a target back onto one of your players to roll more block dice is a basic tactic at blood bowl. It is especially useful against pests with the Block + Dodge skill combo. Against these players, it is not uncommon to roll up to nine or more block dice to knock them over.
Example of a Series of Pushes
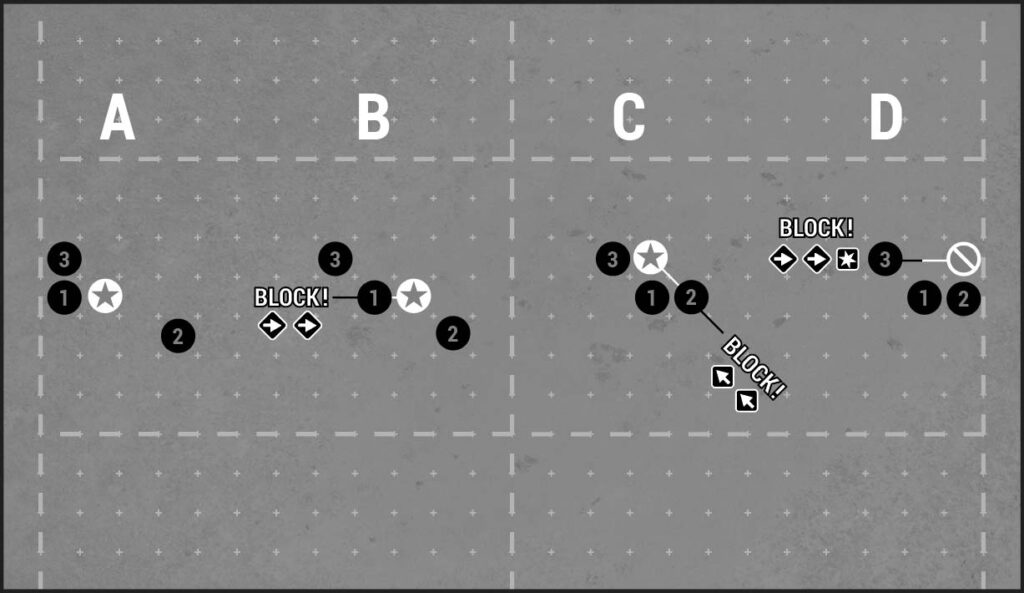
Chain Pushes
All the best blood bowl coaches are masters in the art of chain pushes. It is an art that every coach must master not only to multiply surfing opportunities but also to obtain favorable blocks where a rookie coach would only find suboptimal ones… or none at all.
Push the Target Closer to a Blocker
It is always best to plan as many block dice as possible to knock down a target, as you can never guarantee that it will fall on the first dice roll. Planning a few chain pushes can help multiply the probabilities of success.
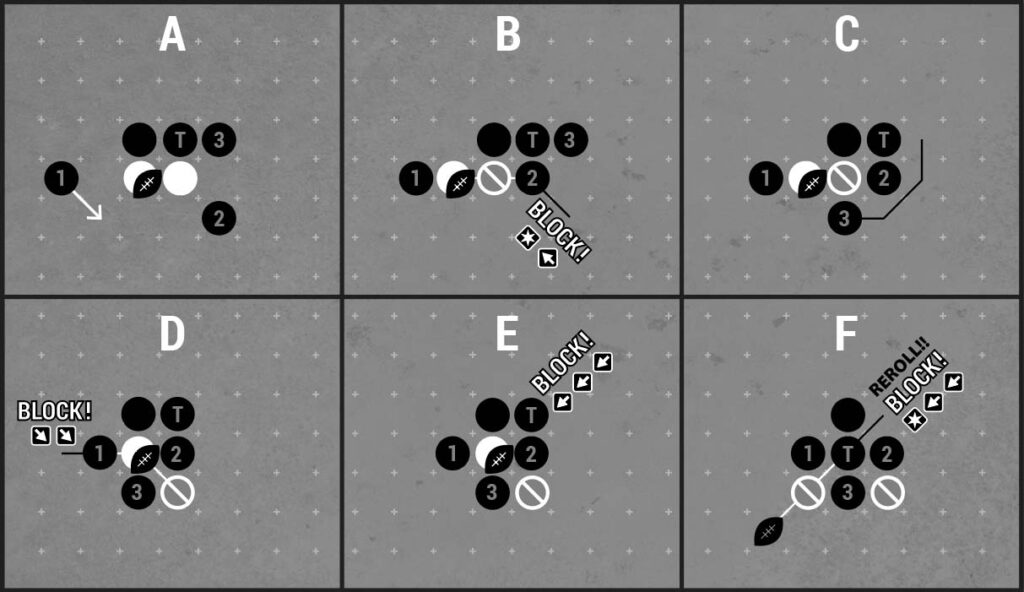
Push either a Support or the Blocker Closer to the Target
Sometimes it is not the target that you need to move with chain pushes to improve your odds; it is the tackler… or the support necessary to get an extra block die.

Tip #2
A clean slate on the line of scrimmage
At blood bowl, it is a basic courtesy to knock down all the opposing players on the line of scrimmage. It is just good manners. Therefore, when positioning your players before a kickoff, position them so that you will only have two-dice blocks or better. Do not wait until after the kickoff to see if you can get two-dice blocks from your positioning. By Nuffle’s bastards, do the brain work before the kickoff!
Also, anticipate that these free blocks will result in pushbacks. Therefore, arrange your players to take advantage of not just one block opportunity per opponent, but two or even three! This will increase your number of rolled dice and your chances of knocking down these players, rolling their armor and sending them off the pitch.
Example of Serial Pushes on the Line of Scrimmage
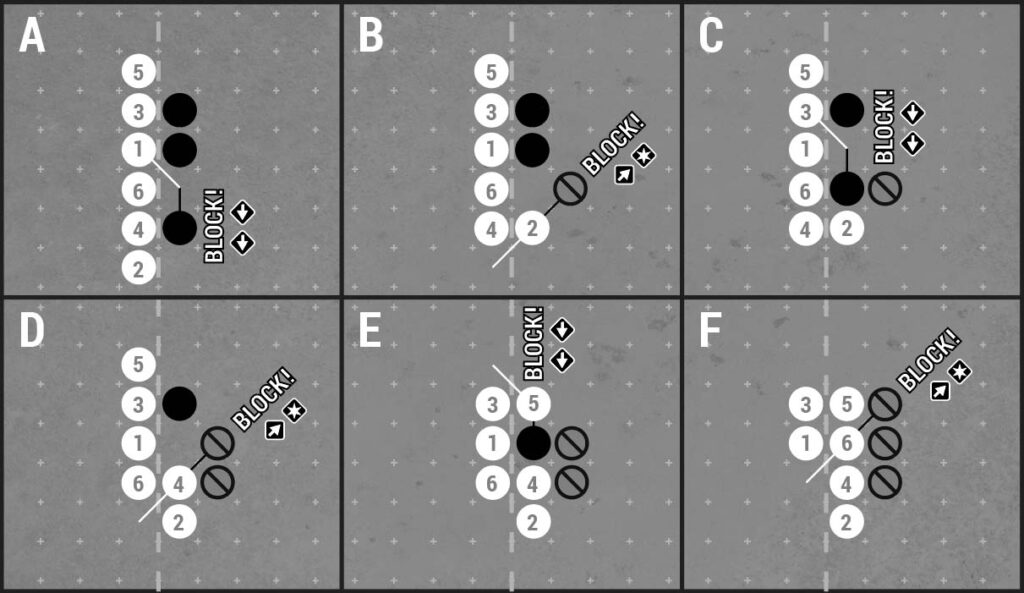
If you have players in your lineup with the Guard skill, you will need to position them cleverly along the line of scrimmage for maximum effectiveness. If you do not have players with this skill, you may be “flooded” under your opponent’s strength advantage and unable to make advantageous blocks. It is not pretty, but it happens. In such a case, ideally, hold off the opposing players anyway with the help of a player with the Dodge skill who can then dodge away to avoid taking a block. This will also help you minimize the impact of a hypothetical bad event on the Kickoff Table.
When attacking the line of scrimmage, it may be advantageous to attempt a one-die block, especially if it is to generate more two-dice blocks. Keep in mind, however, that on the very crucial first turn of the drive, you also need to pick up the ball and secure it behind a screen of players. A hasty turnover could prevent you from doing so and even result in leaving you behind by a touchdown.
Tip #3
maximize Your Blitz … and Your blocks
You only get one blitz per turn and ideally, you want to use it to blitz the opposing ball carrier. Unfortunately, they tend to hide behind their teammates, forcing you to explore other blitzing options with, at times, the sole intention of hurting a player.
At blood bowl, as in war, the focus is on eliminating first what is most useful to your opponent. Think of it as a form of degreasing the opponent’s team. However, players with the Block and Dodge skill combo usually have a very low fat percentage and it can be costly in terms of player time and investment to try to remove them first.
This is why the greatest benefits are achieved by first targeting the most vulnerable opposing players relative to the skills you have in your lineup.
Note that we have only discussed the blitz so far, but much of this theory also applies to blocks. For example, a degreasing strategy could influence the order in which a series of blocks would be made against a series of opponents, or also influence which of your players would be sent out to mark a target.
Now, rather than throwing blocks and blitzes at random, it is best to optimize them based on the skills of your players relative to their targets. This will increase your chances of building a numerical advantage, an advantage that will increase the pressure on your opponent and help you roll more block dice on the targets with the lowest fat percentage. This is called the snowball effect.
Some examples of optimizations
- At two equally important targets, hit the weaker armor
- At equal armor, hit the most important player
- Without Tackle, hit the weaker armor without Dodge
- With Tackle, hit the weaker armor with Dodge
- With Incompetent Claws, hit the biggest incompetent armor
- With incompetent Mighty Blow, hit the 8+ incompetent armors
- With Claws + Block and Tackle, hit the biggest armor with Dodge
- Etc
A degreasing strategy is particularly effective if the opposing team has no one to warm up their bench. Any player loss will be painful to them.
Tip #4
Minimize Your Losses
We often come back to this notion, don’t we? That is how important it is! Remember my “secret weapon”. To roll wheelbarrows of block dice, you must have the initiative and apply pressure. This is obviously more difficult to do when you are at a severe numbers disadvantage.
Now that you have learned about the degreasing strategy, you should know that your opponents probably have a good idea of it too. That is why, before each game, you should better analyze your opponent’s team sheet and cover your players on the field accordingly.
Also, note that the difference between an 8+ armor and a 9+ armor may not look like much, but it is 50% more likely to be broken. Similarly, 9+ armor is 66% more likely to be broken than 10+ armor. Wearing solid armor is vital for a player whose job is to be left in contact with others.
If you combine blocks and armor stats, you will find that a player with the Block or Dodge skill and 8+ armor is less protected than an incompetent player with 9+ armor. The same applies to a Blodger with 8+ armor against a Tacle player. Weigh these last sentences carefully before marking an opponent with your fragile player.
Tip #5
Leveraging the Domino Effect
The blitz action is obviously to be used primarily to either attack the ball carrier or to get rid of the player marking your own ball carrier. But in addition to these mundane tasks, a blitz can also be used to free a player who will then support a block who will then free another player who will then support another block, and so on. This is called the domino effect.
In general, incompetent players provide support to players who have the Block skill. Be careful, however, if you have to dodge an incompetent player to provide support. Remember that a one-die block with the Block skill is more reliable than a 3+ dodge, so it does not always make sense to attempt a dodge to provide support.
Conversely, a 2+ dodge is just as reliable as a one-die block with Block, and it makes more sense to free that player in order to send him in support. That said, if your player has the Dodge skill and is not held back by a Tackle, it almost always makes sense to dodge him or her to support a Block and roll more dice.
Tip #6
Marking opposing players
Well yes, sometimes you can put players in contact … just do not do it without a good reason!
The Trap
We are not going to revolutionize the blood bowl world today with this tip! It is about as old as the cage! The idea is to trap a slippery target between two of your players in order to increase the difficulty of its dodge to free itself.
A threshold of 3+ (or 4+) to dodge a player free is more worrying than a threshold of 2+ (or 3+). The increased risk of a turnover or burning a reroll helps convince your opponent to postpone the dodge until later in his turn. In return, this postponement increases the chances that any turnover will occur before the target has had a chance to dodge away. It does not work every time, of course, but it is likely enough to be attempted when it is reasonable… especially when the player closing the trap can be integrated into another maneuver such as a screen, column defense or support.
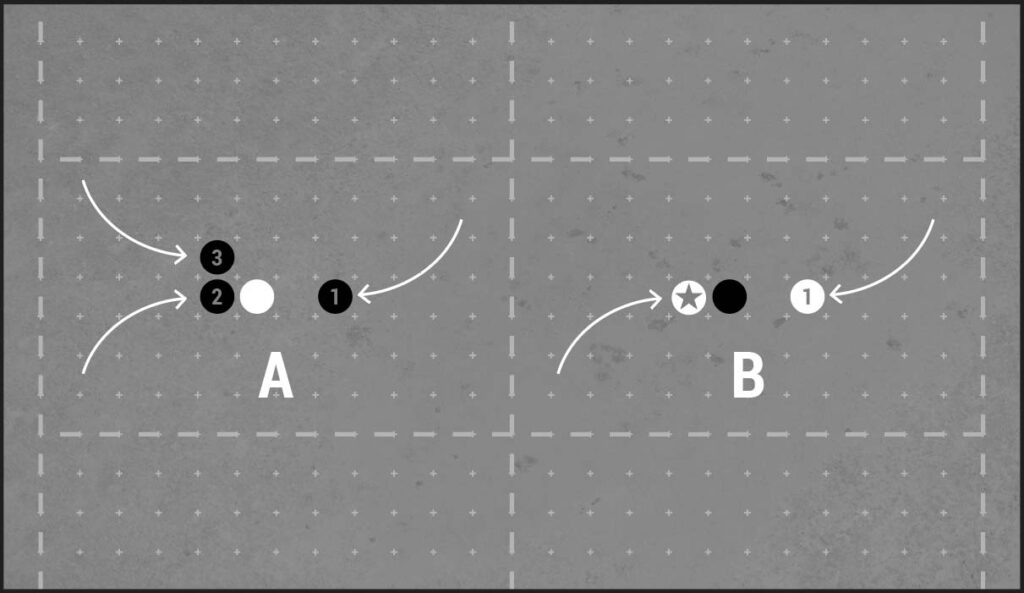
Flooding an Area
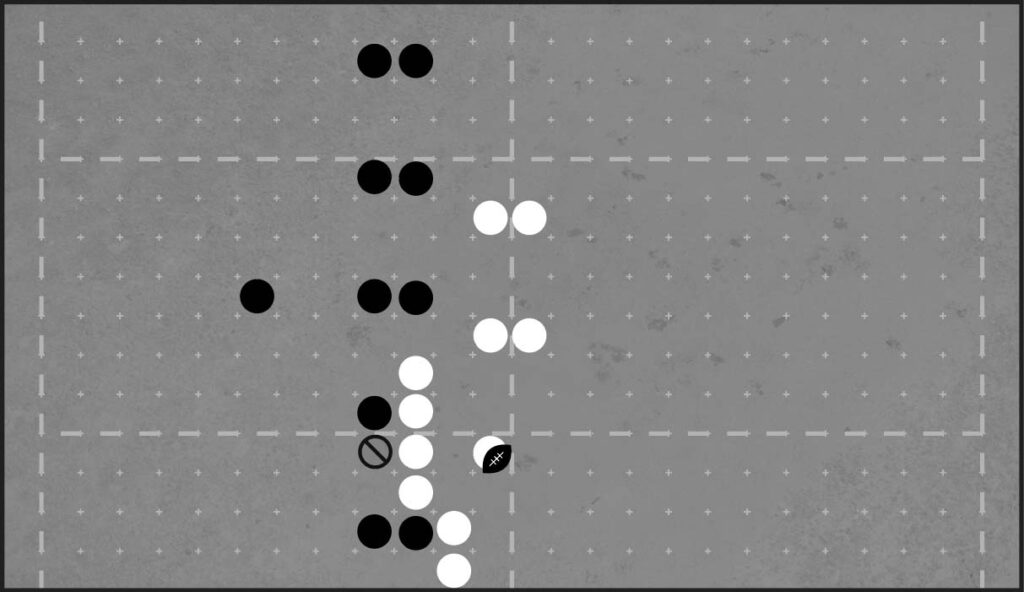
Basically, if you mark the entire opposing team mano a mano, you are likely to get hit a lot in return. However, if you heavily flood a small group of opponents under a considerable total of strength, this kind of retaliation is much less likely.
This maneuver is quite simple to grasp. If, for example, you mark three opponents with six of your players, they will block you a maximum of three times in return. This should, in theory, leave you with three players in a position to make as many blocks themselves… And that is if you coach like a potato and leave blocking opportunities to your opponent!
When the best coaches flood an area of the pitch, they do so with the intention of taking the cake and leaving you the crumbs. In short, it will not be a cakewalk!
Going All-In
An “All In” is a game situation where a coach finishes his turn with all of his players in contact with the opponent and, at its core, it is totally opposite to the notion of mobility (but presupposes initial mobility).
A coach who has an overwhelming numerical or strength advantage will sometimes try to exploit the snowball effect common at blood bowl. Indeed, it is rare that a team with a strong strength or numerical disadvantage will come back in the game in terms of strength and numbers… In fact, it is statistically more likely that their situation will deteriorate exponentially. This is how a well-controlled “All In” can accelerate an opponent’s downfall.
Tip #7
Phishing the opponent
I include this tactic near the end of the article because it is convoluted and not often used. Nevertheless, rookie coaches would do well to know that it exists … and that it is most commonly used against them. This tactic is simply too risky against a high-caliber opponent!
To encourage a reluctant opponent to fraternize in a brawl, you can try to phish him with the ball. The tactic is all about giving him a chance to blitz your ball carrier. Yes, you read that right! The idea is to leave an expensive hole to exploit in your ball carrier’s screen. This way, if the opposing team takes the bait to get to the ball, they will receive a lot of blocks in return.
Be careful to set your trap carefully, however, as a lucky blitz and a bad scatter could quickly put you behind by a touchdown.
Note: Be careful also to spare the sensitivities of some rookie coaches at the risk of disgusting them of the game forever.
In a Nutshell
A coach mindlessly looking to roll a lot of block dice often plays the game for his opponent. It is rather by knowing and applying the stats related to blocks, selecting the king skill on the appropriate players, applying pressure, and using a number of tips to maximize blocks, that a coach naturally rolls a lot of block dice … and ultimately, wins games.
[give_form id=”12090″]
FURTHER READING
- Blocking Statistics, by Taureau Amiral
- Blood Bowl Teams Strength, by Taureau Amiral
I be started playing this year and all of the articles are the best written in the whole wide web! Thank you so much!!!
This is the single best document I’ve found on this. I wish I found it BEFORE my first few games!
I love this kind of content! One question on the 8+ armor Blodger vs. 9+ armor no skill: How did you get to the conclusion that the former is less protected?
On a 2-die block, the blodger gets knocked over 11/36 times and breaking the armor is 15/36. So 165 / 1296, or 12.73 percent.
The 9+ armor piece gets knocked over 27/36 times and the armor is broken 10/36 times, which gives us 270 / 1296.
What am I missing?
Hey Yaulande, you are not missing anything. Thanks for pointing this mistake. It is either Block or Dodge, not Block + Dodge. I have corrected the article accordingly. 🙂