
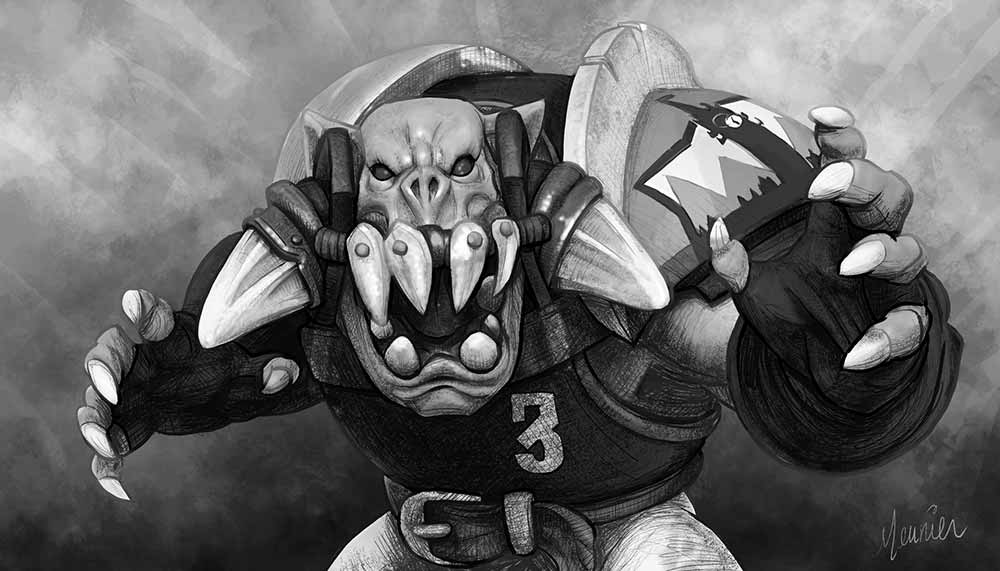
Hello. I’m the coach behind the infamous, thick-headed Gorn N’hleg. When I offered up to Taureau Amiral the idea of a chronicle written by the head coach of my new Black Orc team, my intention was to run the Bytown Maulers for a year and document what happened. Yes, there would be advice and tactics for fellow Blood Bowl enthusiasts, but it was as much (or more) a story about the most obtuse head coach imaginable and his gang of misfits. You might recognize my name as the author of the Up and Under web series that appears in this website. If you’ve come to love the story of the Mytilan Militantes, then you’ll know I’m a story-teller as much as a Blood Bowl coach.
So, given that Gorn N’hleg’s chronicle had the story of a thick-headed coach at its heart, I figured a follow-up article exploring what I, Ian H. McKinley, had learned after a year of playing one of the newest teams in Blood Bowl might be a good way to wrap up the series. Hence what you’re reading now. Let’s dive in.
General Observations
Black Orcs are a tricky team to play, and that’s coming from a guy with many games of Blood Bowl under his belt. One of the reasons for them being so challenging is the very make-up of the team. There are only three positionals you can take, which means you don’t have a lot of options for confronting the myriad challenges that Blood Bowl always presents (and which makes the game so compelling). The bulk of the players you do have are slow and dangerously immobile.
Imagine: You have a chance of scoring but need an Orc to blow a hole in the opposing line. That’s all well and good if there’s a free Black Orc nearby with the movement to get into position. But what if all the Black Orcs are marked and six squares away? Yes, theoretically they could dodge free and rush twice, but that’s a formula for devouring your re-rolls … a formula that won’t always succeed! So, whereas if you were coaching a normal Orc team, you might well dodge a Blitzer free and use him to open the way for your Goblins, with your Black Orc team, you’ll likely have to forego the opportunity noted above and play with a keen eye on positioning and timing in the hopes a more achievable chance to score presents itself.
A rough start
Early on in a Black Orc team’s development, many basic actions are risky. Want to pick up the ball? Well, you’ve got to risk a 3+ if you try with a Goblin (4+ if you try with a Black Orc). Want to hand that ball off to another Goblin? Again, you’ve got to risk a 3+ on the catch. Yes, you get a re-roll on dodging clear of a marker with a Goblin (providing your adversary isn’t a tackler), and you get a re-roll that comes with Brawler (I’ll get into the inherent risks of Brawler in great detail below), but you don’t have starting skills that will reduce the risk of most basic actions, actions other teams take for granted. For example, a Skaven Thrower has a built-in re-roll for picking up the ball, an Elven Union Catcher has a built-in re-roll for making a hand-off successful, a Bull Centaur has a built-in re-roll for Rushing. In terms of the basic action of throwing a block, Human and Orc teams can start with four Blitzers with Block, reducing in half the down-side of hitting an opponent.
Thus, Black Orc teams are a bit like many of the Stunty teams in terms of risk involved in undertaking the basic actions. Brawler helps Black Orcs elevate themselves over Stunties with their basic 2 die block actions, reducing the risk from about a 1 in 9 chance of failure to about a 1 in 18 chance. Luckily, contrary to a Stunty team, roughly half your team has easy access to general skills … and those players have the stat line to use those skills efficiently. Just don’t expect your Black Orcs to perform great early on.
other general thoughts on Black Orcs…
Brawler is a Poor Man’s Block: Yes, your Black Orcs come with interesting initial skills. Grab is great. It helps offset your poor mobility by imposing unfavourable positioning on your opponent. Some Blood Bowl podcasters love Brawler, but I suspect that’s only because it comes on up to six of your heavy hitting pieces for free. They’d never choose it if Black Orcs didn’t come with it. They’d choose Block once they had the requisite Star Player Points (SPPs) to level-up. And indeed, once you have Block on your Black Orcs, then Brawler becomes much more useful because there’s suddenly no down-side to using it.
But, until you get Block, Brawler is truly a double-edged sword. Take it from me, you’ll be faced with many a situation in which you’ve rolled Both Down & Skull and you’ll have to ponder re-rolling the Both Down or using a team re-roll to re-roll both dice. I can tell you from harsh experience, re-rolling a Both Down result into either another Both Down or a Skull happens more often that you’d like (1 time in 3, in fact, but recency bias and confirmation bias will make you think it happens 50% of the time!).
Here are the actual turnover statistics relevant to the use Brawler in comparison with a player who has Block and a player who has neither Block nor Brawler:
Turnover rates
| 1 die block | 2 die block | 3 die block | |
| Block | 1/6 | 1/33 | 1/200 |
| Brawler | 1/5 | 1/18 | 1/60 |
| Neither | 1/3 | 1/9 | 1/25 |
The most-applicable section is the one showing the stats for a 2 die block because usually you’ll be hitting players with ST 3, or you’ll have positioned assists to make sure you have a strength advantage on your blocks. So, if you’re being a good Black Orc coach and throwing blocks with your players with Brawler as much as possible, you can expect a turnover about one turn in three. Keep that in mind
Don’t start off thinking Brawler’s going to make your team dominant. It won’t.
Bulk Up: You need your strength advantage to overcome your lack of speed and mobility. What this means – and you’ll see it reflected in the team builds I propose – you need to take the Troll and as many Black Orcs as you can afford. The practical impact of this should be that you can use the Troll to tie down two, or hopefully three, opposition players in a key part of the pitch, freeing up your Black Orcs to move to the point of attack. Getting the Troll in the line-up might actually free up two of your brawling players, so take full advantage of that. Yes, for the cost of a Troll, you could get two Goblin Bruisers with some gold pieces to spare, and those Goblins could also pin down opponents, but we all know the staying power of the Troll is much better, especially when you factor in Regeneration. And although your Trained Troll doesn’t have Thick Skull like most other big guys, and although 10+ AV isn’t invincible, he is relatively cheap.
Keep an Open Mind: You’re usually going to bash and bash with this team, but try to remember all the options you have at your disposal. Black Orcs have access to cheap bribes, so using a 45,000 gold piece Goblin Bruiser to get rid of an expensive opposing player via a foul is a great trade-off even if the referee’s doing their job. At key moments, use a bribe and the likelihood is the foul won’t cost you a player. Going beyond fouling, if you’ve got the Troll on the pitch, you’ve always got the potential for a One-Turn-Touchdown even if you concede on Turn 16. Indeed, the Troll offers you something new in BB2020: if you’re facing Elven Union Blitzers with Block and Side Step and Dodge as a level-up, think about using your Troll to spew its projectile vomit on the opposition so that you’re not shifting the player to a position that’s disadvantageous to you if you don’t get a POW! Also, if you’re facing Amazon teams that start with four Blodgers, this tactic can mitigate against your team not starting out with tacklers.
Building Your Team
Tournament Builds
You’ll want to take advantage of the incentives BB2020 has built into the new game system for the recruitment of Star Players. Compared to earlier editions of the game, stars are less expensive now and offer you a way to compensate for your team’s failings, which in the case of Black Orcs are poor ball-handling and a lack of mobility. Unfortunately, teams with the Badlands Brawl special rules don’t have many options for ball-handling stars like Hakflem, so consider some of the other stars that give you better movement than the MA4 of Black Orcs and the Troll.
Helmut Wulf at 140,000 isn’t a bad option; he moves 6 so he’ll have a chance of covering the breadth of the pitch if ever an Elven catcher penetrates deep into your backfield. If ol’ Helmut comes blitzing in with his chainsaw, you’ve got a decent chance of taking the player down (not necessarily the case with Varag Ghoul-Chewer or Morg’n’Thorg if you’re facing a player with Dodge). Getting Helmut to sweep for you is a better option than trying to manoeuvre over a squad of Goblins. Also, your team can purchase bribes for 50,000, so you can keep Helmut on the pitch for longer than would otherwise be the case by shelling out relatively few gold pieces.
Another option is to forego the sixth Black Orc on your roster in favour of either Varag or Morg. Both have MA 6 and can either sweep for you on defence or penetrate deep into the opposition backfield on offence. The chances of you affording Morg are diminished since the release of the November ’21 FAQ, which increased his cost to 380,000, but he remains impressive. Meanwhile, although Varag can’t pass very well, with an AG 3+, he can handle the ball better than your Black Orcs (unless you have re-rolls to burn) and he has the advantage of Jump Up. This makes him more of a scoring threat.
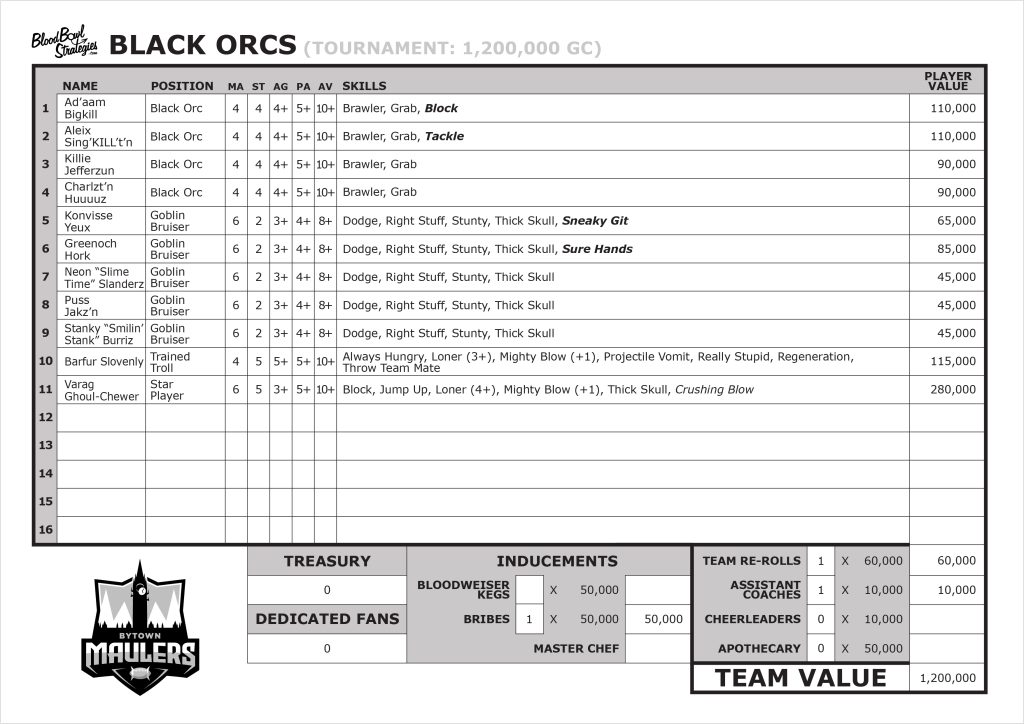
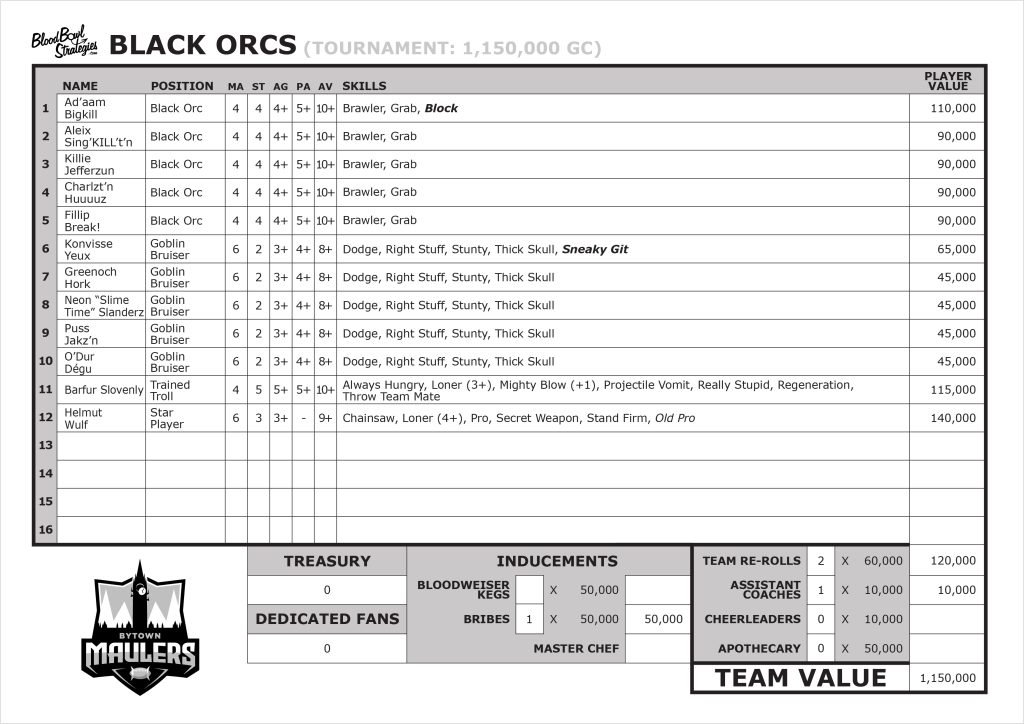
I have included below two team builds for you to consider, one for a rich tournament allowing you to spend 1.2 million gold pieces, the other for a more modest 1.15 million. Take a look at them and you’ll see some viable options.
Thoughts on Skills
Block is King: Tournaments usually give teams a certain number of additional skills based on the tier of the race the coach has chosen to run in the competition. You’ll see from the team builds, I’m assuming some of that is built into the team selection. If you don’t take Varag or Morg, make sure you have at least two Black Orcs with Block. Block helps stabilize your re-roll consumption and heightens the odds of knocking down players, and thus of breaking their armour. It also minimizes turnovers on blitzes. You’ll want one in the thick of the mêlée pounding the opposition and the other held back to have the freedom to blitz to where you need an opposition player to fall.
Build a Tackler or a Wrestler into your Squad: Unless you’ve chosen to take Helmut Wulf in your build, you’ll want one tackler on your team. Yes, you’ll come up against the odd team of Dwarves or Tomb Kings that have no dodge in their ranks, but you’re just as likely to come up against Elves or Stunties, who’ll rely on dodging away from your heavy hitting pieces and screen ball-carriers thrusting up one flank or the other. Ball-carriers usually are given the ball because they’re blodgers, able to withstand a Both Down or a Defender Stumbles result on the block dice. Thus, choosing Tackle, which is a primary skill choice for Black Orcs, is 20,000 gold pieces well-spent. You’ll note I haven’t got a tackler in the 1.15 million build: that is because I would be relying on Helmut to blitz dodgers/blodgers.
If you so prefer, Wrestle is a good substitute for Tackle. Like Tackle, it can turn one of the outcomes of your block dice from a failure into a success. The up-side of Wrestle is that it might be more useful to you. If, during the tournament, you face teams with no dodge, you won’t have bought a skill that has no possible impact on the game.
Sneaky Git is Gold: Always have at least one Goblin Bruiser with Sneaky Git. His skill gives you no downside if you can’t break armour, so always foul with him, even if you have no support. If he gets caught hurting an opponent, then you have a decision to make about whether you use your bribe or not and whether Helmut’s on the pitch. But resolving that tricky question is usually worth all the games where you’re going to KO or injure your opponent’s players. Grab on the Black Orcs aligns well with fouling as a general tactic, but Sneaky Git further leverages it by allowing you to move after having committed the foul.
Designate a Ball Handler: After you’ve got Block, Tackle and Sneaky Git players, I’d advise Sure Hands as a secondary skill choice for a Goblin. It’ll help you avoid getting strung out while trying to get the ball if you roll poorly on the first chance you get to secure the pigskin. If you don’t secure the ball in the first turn or two, take it from me, your opposition will flood around your Black Orcs and you’ll be in deep trouble. Now, if you take this option, make sure you protect the player! You’re paying an additional 40,000 gps for the skill: it behooves you to take care of the player. Don’t leave him exposed and don’t foul with him.
Depending on the tournament rules, you might have lots of skills to add on. Mighty Blow, Side Step, Catch, and Guard are all useful to you … or even Brawler on the Troll. But they’re farther down the list and you probably won’t get to use them much in the tournament scene.
The 1.2 million GPS tournament build
The 1.15 million GPS tournament build
League Builds
OK, for a league, your team build is going to be different given that you can accumulate additional players on your roster over time. Also, you’ll be developing your players to address the shortfalls of your team and to leverage their strengths. Those five sub-points above for tournament builds (starting with Block is King) remain valid guiding principles (ie. Block is STILL King). However, you’re not going to need all your players to have it. Yes, eventually you’ll want as many of them as possible to have Block, but only after you’ve gotten the Sneaky Git and after having considered the advice about other skills in the quote block above (don’t worry so much about the Ball-Handler bit; I’ll address that below). The key will be to have a couple of solid, reliable hitters on in your line and then develop specific players to cover you for specific situations. Yes, by definition this approach is “situational” but it’s also prudent because it expands your capabilities.
I’ll add a couple of sub-points to the list, though.
Money’s Tight: Your team isn’t a high-scoring squad like Wood Elves or Skaven. You’re not going to be rolling in the gold following each match. You’ll be doing great if you have an additional 10,000 gps for having scored one touchdown. The impact of this is that it’ll be hard to build up enough gold reserves for additional re-rolls or to fill out your roster with the Troll or a sixth Black Orc after your initial build. So I recommend taking all the expensive pieces and going light on Goblins to begin with. You could take only the four you need to have a full team of eleven players and keep money left over for investing in Dedicated Fans, but I don’t suggest that. Goblins will get hurt or sent off. Thus, it’s good to have one on the bench to begin your game.
As you play games, you’ll have some tricky choices to make. Do you let your money pile up so you can buy a third re-roll, or, do you spend 50,000 ahead of a match to buy a bribe for your upcoming game. Personally, I think you can survive on two re-rolls and that the bribe is way too good a deal for you to pass up. However, if you find your reserves are getting close to 120,000 gps, I’d forgo a bribe for a game and get the re-roll following the next match.
Related to the above, you’ll have to decide whether Apothecaries are worth the cost now. I find they’re only really useful in bringing back someone who you already know is Badly Hurt (so there’s no down-side to using the Apo), or, to avoid Death or a Lasting Injury. I’m still wavering on how I come down on this question. I think I’m leaning towards not adding an Apothecary until you’ve got lots of gold to blow. You’ll see this reflected in my League Build but also in my Tournament Builds listed above. That said, there is one way to use an Apothecary that might make a lot of sense for your Black Orcs. Your team plays best as a pack getting right into the the brawl. Apothecaries are great for keeping your first early KO’ed Black Orc on the pitch (leaving him stunned). This helps prevent, or at least delay, the dreaded “snowball effect” (the fewer Strength 4 players you have left on the pitch, the easier it is for your opponent to get rid of the ones who are left).
Game the League System: We all do this, right? We min-max as best we can. So, for skill-ups, you might decide to go random on your Gobbos because if you don’t like the random skill generated, you can always put the unlucky bastard on your line of scrimmage in your upcoming match against Dwarves and let him get killed. And if you do like the random skill, you’ve got something useful for an increment in team value of 10,000 gps instead of 20,000 gps. And, after you’ve got Block on a Black Orc piece, you almost can’t go wrong randomizing your skill-ups … nb: remember, I said, “almost” … the hated Pile Driver is still a risk!
I suggest you go random once you’ve got what you need on a couple of Black Orcs. Your first skill-up for a Black Orc should be Block. Then use this piece do to all your blitzing until you’ve got another with Tackle, and then let the Tackler loose on any dodgers or Stunties.
Your Goblins are the likeliest to score, so they’ll accumulate SPPs relatively quickly. Your first level-up with a Goblin should be Sneaky Git, so save your SPPs until you’ve got one with six, thus allowing you to choose the skill. After that, I advise going random with Goblin level-ups unless you have one that gets a touchdown and also bags the match MVP award. If you’ve got one on seven SPPs, then you’re more than half-way to the fabled ball-handler. Don’t make this a priority – it’s too hard to keep Goblins alive to invest much team development in them – but if you can take advantage of a situation where one lucks into being close to getting Sure Hands, save up the SPPs. Only do it on one Goblin, though.
Two Side-Step Goblins, one on each flank a square away from the sidelines, are useful for preventing against Two-Turn-Touchdowns (you know, when your opponent thrusts down one flank, knocks a defender out of the way and cages up with a ball-carrier against the sideline and within range of the endzone). Side-stepping Goblins with Diving Tackle are brilliant. If that little fellow can subsequently get Wrestle, you have the perfect sweeper!
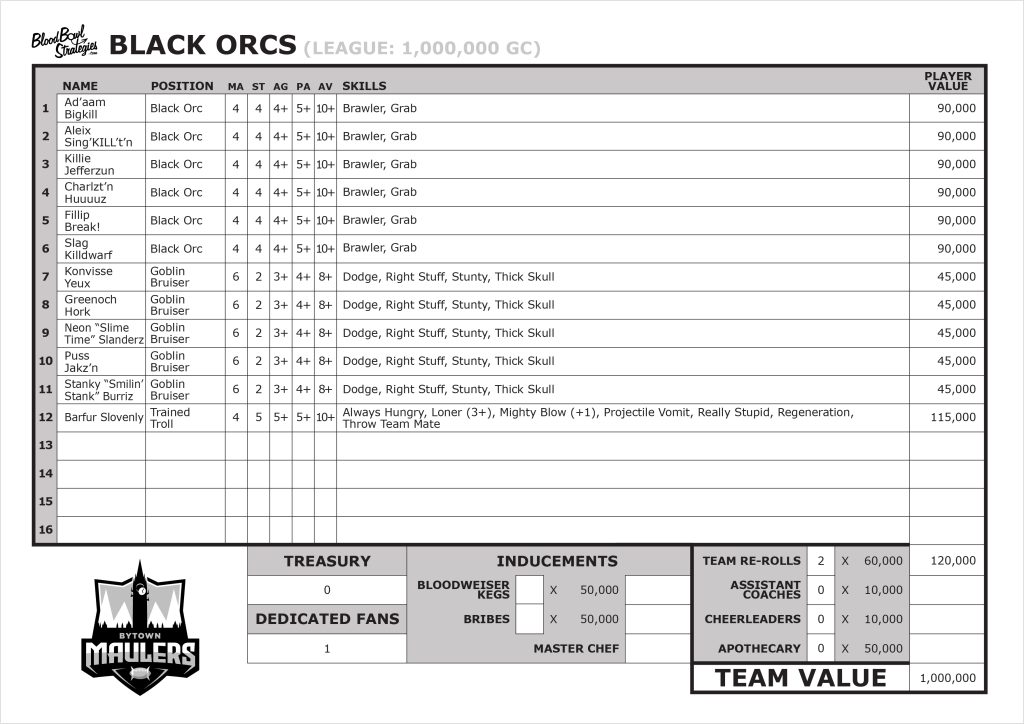
The 1 million league build
Playing Your Team
Even if the name “Black Orcs” might strike fear into your opponent’s mind, the truth is the Black Orcs aren’t particularly violent and have difficulties causing casualties. You’ll be tempted to “get stuck in”, but until you develop Block or Guard, carefully weigh the usefulness of following-up on a Push Back result when you block. If you end up tagging a player with Block, that’s an invitation for your opponent to put your player on his ass. When facing a killer team laden with Claws and/or Mighty Blow, Black Orcs should avoid unnecessary contact just like any other team. Like I mentioned in the consideration of whether to take an Apothecary or not, every additional injured Black Orc brings you a step closer to that dreaded “snowball effect”. And even if an AV of 10+ feels invincible, it’s far from the truth. A look at the Armor and Injuries statistics reveal that an average of 1 in 15 hits will KO+ a Black Orc, and 1 in 8 Mighty Blow hits will result in a KO+, and 1 in 4 if he is hit by a Claw. And that’s not even considering how often your players will get stunned. So, when you Push Back an opposing player, most of the time it’s better to keep your players safe … and mobile, which brings up to the first key point :
Positioning is key
A lot of the points below deal with positioning or controlling areas of the pitch. This is really important with Black Orcs. Only your Goblins can get around (relatively) quickly and you don’t really want to be putting in place a last-ditch attempt to prevent a touchdown with just your Gobbos. Keep in mind the Black Orcs’ 4+ AG. This means they can’t dodge away from a marker very well. Yes, if you’ve got a re-roll and you’re willing to use it, then your player’s odds aren’t bad for dodging clear of a marker and getting to where he’s needed. However, that’s a recipe for burning your re-rolls and causing turnovers. At first I thought it was important to cover the breadth of the pitch on defence. Later I reckoned it was better not to leave Black Orcs isolated on an island off away from the action. I’m more likely to cluster them in the middle of the backfield where they can get to one side or the other.
At some point while you’re on defence, your opponents are going to break through and get into your backfield. Unlike Skaven, Elven Union, or Lizardmen, you don’t have a team that’s good at flooding from one side of the pitch to another, or from midfield into your back third. Thus, when a team inevitably breaks through, don’t forget that Throw Team Mate doesn’t only need to be used to score One-Turn-Touchdowns. You can use it to get a Goblin closer to your adversary. Yes, one Gobbo likely won’t make a difference, but he can tie-down a Tomb Kings’ Thro-Ra, forcing him to use a square of movement to Blitz the Gobbo off him. Also, the Goblin you throw might be the assist another Goblin needs to turn a two die uphill block into a one die block.
Protect your Goblins on Offence, Screen your Black Orcs on Defence: When I began playing with my Black Orcs, I instinctively used my Black Orcs to impose tackle zones on the width of the pitch so as to protect my Goblins. Anyone having a go at my stunties would have to get through a Black Orc first, or risk dodging past them. After two league seasons playing the Maulers, ending with a good cup run and drawing the championship game, I’ve realized that strategy works well on offence but less well on defence.
Rather, on defence, because your opponent usually dictates the point of attack, you need enough mobility to deploy your strength four players where they’re needed. So now I use my Goblins to screen my Black Orcs and I keep these latter players relatively central, knowing I can likely re-position them to one flank or the other in my turn. You see, if you use your Black Orcs to protect your Goblins on defence, your opponent can mark your stronger players. Yes, you’ll get a free hit on some skill-less lineman, but you won’t be getting across to the main opposition thrust up-field. Also, Goblin Bruisers have the Thick Skull skill which, when combined with Dodge, makes them surprisingly resilient … about on a par with the squishiest linemen of Blood Bowl, like those of Skaven or Wood Elves. Their chances of staying on the pitch are fine if you send them tagging some skill-less players (those with no Block, Tackle, Frenzy or Mighty Blow). Just don’t tease Nuffle too much with your Goblins or they’ll feel HIS retribution.
If your Goblins are screening your Black Orcs, you won’t have to rely on a risky 4+ dodge to get your Orcs where they’re needed.
Now, having said the above, you’ll have to use your judgement. If you’re facing a team with a hunter-killer Blitzer with Mighty Blow and Tackle, then maybe you should keep your Gobbos protected. Yes, the hunter-killer might tag or bring down your Black Orc, but your player is likely to be able to get back on his feet and do some tying down itself: having not to worry about a hunter-killer is a good thing.
You’re Not Mobile, So Impose Bad Positioning: Remember the Grab skill on your Black Orcs. Those guys aren’t mobile, especially once stuck into the fray. So use their grab to impose a bad position on your opponent’s players. Make them cluster together. Try to get a Black Orc or two all around the cluster so that even dodgers will have trouble getting away. Use the skill to put your strong players between the opposition and your ball-carrier, or to put your strong players beside the opposition ball-carrier. Yes, Elves will likely be able to get away from you regardless, but most opponents won’t.
A corollary to this is to use your Grab to free up friendly players, thus improving your team’s positioning. For example, if you have two Black Orcs in the mêlée being marked by two adversaries, but where one of the Black Orcs can hit the player marking his teammate, then, instead of hitting both and hoping to cause Casualties, use one Black Orc to free up the other. Then move away the other piece and get him into a more useful position.
A Troll to tie-down opponents
Given that your Black Orcs aren’t quick enough or agile enough to impose themselves everywhere on the pitch, you need your Troll in the thick of things to anchor your line. But you don’t necessarily need him dishing out hits. It is often enough that he’s managed to get himself into contact with two or three opposing pieces. If he’s already in position, consider not activating him so that he doesn’t go Really Stupid. Only have him hit (or vomit) if you’re certain him losing his tackle zone won’t cause you problems. Now, this strategy works less-well against Elves or opponents with Dodge, but the more you’re making your opponent roll dice, the better. Don’t blitz with a Troll unless you have no other choice (see the exception noted immediately below).
Blodgers with Side Step: Ah yes, these pieces are the bane of many teams. Elven Union Blitzers who are given Dodge, or an Imperial Nobility Blitzer (who has access to Agility Skills like Side-Step through their primary skill access), or even a well-developed Skink … these players are damned tricky. And hence, they’re often ball-carriers. Hopefully your team has one tackler who can bring these players down by throwing a block, but don’t forget, you have a Troll who might do the job for you.
Here are the actual statistics for bringing down a blodger with your Trained Troll (note: these stats don’t weigh the chance of your Troll going Really Stupid):
Success Rate for a Troll trying to Knock Down an armor 7 Blodger
| Stun + | Ko + | |
| Two Die Block + Mighty Blow | 1/6 | 1/12 |
| Projectile Vomit | 2/5 | 1/6 |
When you’re pondering whether to blitz with your Troll in the situations described above, remember, yours is a “Trained” Troll, with 3+ Loner. His Really Stupid can be particularly crippling if you don’t have a player in easy reach of the Troll (often requiring the diversion of a Goblin who could be put to work elsewhere and a 1 in 9 dodge to help activate the Troll – which isn’t assured).
Risk Management
The Brawler Conundrum: I talked about this at the beginning when I noted Brawler was a poor-man’s Block. Experienced players will know that it’s usually better to do the easy stuff before risking a roll of the dice, and, that it’s usually better to roll as few dice as possible. But of course we all know there are some instances where knocking down an opponent will crack open a whole flank of the pitch for your team to flood into. So you risk throwing a block or declaring your blitz before you pick up the ball and run into the empty space. This is how I often play my Skaven.
But Skaven have Blitzers with the Block skill. Your Black Orcs don’t; they have Brawler. If you risk dice-rolling too soon, you’re going to be faced with that dilemma in which you’ve rolled Both Down & Skull and you’ll have to ponder re-rolling the Both Down or using a team re-roll to throw both dice again. The dilemma underscores the importance of doing everything that requires no dice-rolling before you lay down any blocks. Position your players to plug up any holes, move so as to protect the ball lying on the ground, shift your Goblins so that they’re more protected. Then roll your dice.
There’s an exception to the “Don’t blitz with a Troll” rule. Those side-stepping blodgers are often poorly armoured. They’re vulnerable to the Projectile Vomit attack. Even if you don’t succeed, at least you won’t have displaced the opponent into a position more favourable to them.
The Ref Isn’t your Enemy; She’s your Friend: Fouling should be a core tactic, though I’d advise you to take the risk only if you have lots of support for the foul in question. If you can get the assists necessary to bring the target of your armour break roll to 5+, then risk-wise, the foul will likely turn out to your advantage. If your target for the roll is 6+, then the risk to the reward calculation is about even whereas if your target is 7+ or higher, then think twice about committing this heinous act. Now, Sneaky Git changes these calculations greatly in your favour. There’s no down-side if you fail to break armour, and if you do break armour, getting sent off can sometimes be worth KOing an opposition player.
Now, I’d advise you not to foul cheap opponents. Don’t risk ejection on fouling a Skeleton or a Snotling. However, if you can go after a Wardancer, a Ghoul, or a Big Guy, then do it. Obviously, don’t commit the foul with your ball-carrier and do it after you’ve done everything else. Also, have your team deployed to prevent your opponent from taking advantage of a turnover caused by a sending-off. Which gets me to the point of this heading …
Your team gets cheap bribes, so take advantage of them. Buttering up the referees is worth the investment because sometimes you’ll want all the help you can get on a foul. This is particularly the case with opponents with high armour values. So sometimes you’ll have the opportunity to do a foul and then redeploy your players after the foul has been successful. This is a dangerous tactic unless you have a bribe. If you do have a bribe, then your risk is greatly reduced.
Even if you’re playing a league game and you’re the overdog, buy a bribe if you can afford it.
Learn to Take your Lumps: If you can survive a Double Skulls roll on a block, or a flubbed-up dodge, then don’t always re-roll the dice. The fact you can now use multiple re-rolls in the same turn leverages their usefulness. If you can, try not to use them until you need to pull off a really tricky play (ie. a last-turn Throw Team Mate for the winning touchdown).
In Conclusion
Black Orcs are a tricky team to play and I wouldn’t recommend them for rookie coaches. However, they’re a very interesting challenge for coaches who have played many different styles of teams and are looking for something different. I have enjoyed playing them, even when I was going through rough patches in my first season. My team was usually competitive and certainly lots of fun. As they get more developed, you can mitigate against some of their worst limitations.
Good luck playing them. You’ll need it!
[give_form id=”12090″]
FURTHER READING
- Black Orcs – The Pedda Theory, by Pedda
This is soo good! Thanks for this strategy guide. Much needed for this race that seems really tricky to coach.
Great guide. I refer back to it often when running blorcs!
Good to know it’s been useful to you.